Showing posts with label earthworms. Show all posts

Wednesday, August 3, 2022

When the Poop Hits the Fan

 Oh boy, here we go...

                                                                Image Credit

We've all seen images of Sri Lanka falling and their leaders being ousted from power.  Irate citizens storming the palace, swimming in the president's pool, and setting things on fire.  Costs are up, food and medical supplies are in short supply, people are hungry (and very angry).  Years of corruption led to a deep distrust in government.  The country is on its way to bankruptcy. 

What happened?  Their leaders bought into green energy.  Everything should be peachy, right?  Sri Lanka has an ESG score of 98 out of 100 - the highest in the world.  In April 2021, their leader, without notice, banned all imports of chemical fertilizers. This caught farmers by surprise and reduced yields of staple rice crops, driving prices higher.  Hunger is a great motivator.  It motivated regime change.

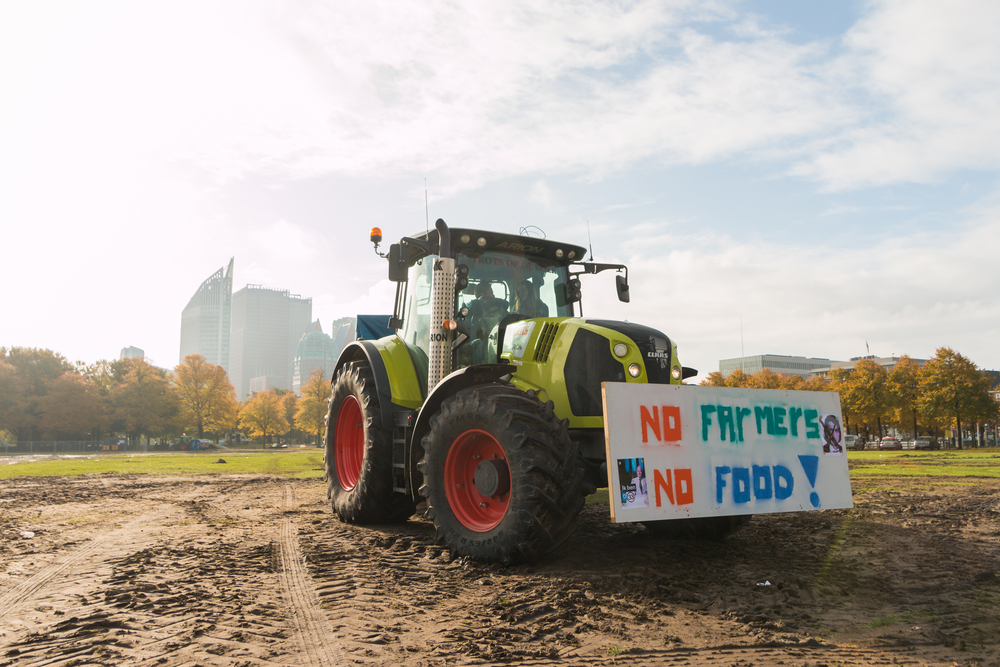
But look to the Netherlands...

                                                                        Image Credit

What is going on there?  The government sparked massive protests by proposing to cut the country's livestock in half to limit carbon emissions and agricultural runoff.  Dutch farmers also say that they feel disrespected the Dutch populace, media and politicians.  They are literally biting the hand that feeds them.

I'd like to talk about these two events for a moment.  Notice the similarity?  Poorly thought out government green initiatives caused this.  It is just my opinion and everyone has one.  Contrary to popular opinion, it is healthy and normal to think differently and have thoughts of your own.  We live on a little homestead farm where we grow approximately 90% of everything on our table.  It comes from right here off the land.  We don't use chemical based fertilizers or herbicides or pesticides.  (More on that in a minute.)  We generate very little waste.  We are about as green as it gets, but I abhor the green movement.  I love freedom.  The green movement is anything but.  I also feel that many green movement people don't practice what they preach.  These elites want to impose restrictions on you, while they're still living high on the hog. 

I want to show you how we grow our own fertility, but before I do, I want to tell you that since our country industrialized and most people live in the cities and don't grow their own food, chemical fertilizers are a must.  We won't use it on our little 5 acres, but if all the people in cities want food, and want it at an affordable price, synthetic fertilizers are a necessity to maintain yields and grow the amount of food and fiber needed to sustain life as we know it.

The other alternative is to have everyone do what I'm about to show you and grow your own food.  First, we compost everything.  All scraps go into a compost bucket that we walk out to the compost pile daily.  Egg shells, squash stems, onion skins, coffee grounds.  Everything goes into it.  


It all decomposes and rots down and attracts earthworms who do their thing in the soil and the soil fertility grows.  We also grow peas and beans that set nitrogen in the soil.  We're growing fertility.  We also make biochar and inoculate it with cow poop and bury in the garden.


At absolutely no cost, we have tree trimming companies deliver load after load of wood chips to us.  They dump them right there in the yard.  An eyesore, to be sure.  But it is gold.  For years trees pull fertility from the soil.  Then, when they are cut down and chipped, all that fertility remains.  It is imported to our 5 acres and I let it decompose.

After three years, this is what the wood chips turn into - black, rich, fertile topsoil!  I incorporate this into the garden.

We pick up dried cow patties and pile them in the back of the garden.  After they 'cool down' for a year, the cow manure is ready to be incorporated into the soil for fertilizer.

Here is our hen house.  You can see the roosting bars.  Chickens line the bars at night to roost, and they poop while they roost.  The poop falls beneath them, piles up and composts.  You've got to be careful with this.  It is so potent, if you put it directly in your garden, it will burn up all the plants.  It is wise to wait at least six months and preferably 9-12 months.

Here is some good composted manure that the hens produced.  Homegrown fertility.

This right here will grow some vegetables!

Those are just some of the ways we boost soil fertility and grow our own fertilizer.  We can do it on our 5 acre farm.  We're not trying to feed the world, though.  We're feeding our family.  We've also had years to learn and make mistakes and implement the new concepts.  How do you do this on hundreds of thousands of acres?  I don't know.  They want to drastically reduce the number of cows, so don't look in that direction.  Composting on that scale doesn't work either.  Chicken litter is used wider agriculturally for nitrogen application, but can't be currently broadcast as efficiently and economically as chemical fertilizers.

Before setting restrictions and making proposals about something like farming that most politicians know nothing about, government leaders would do well to have well-thought out alternatives drawn up and allow appropriate time to change.  Something (experience?) tells me government ain't gonna do that.  You can have the highest ESG scores in the world, but if there's no food to eat, your people are all in poverty, and your leaders are driven from power, what did you really accomplish?  When the poop hits the fan, you oughta pick it up and compost it and grow your own food.

Monday, April 18, 2016

Putting Seedlings in the Garden

I’ve been nurturing 9 different varieties of heirloom tomatoes that I planted from seed, hardening them off on the back patio and giving them some fish emulsion to feed them and make them happy and green.

Heirloom Tomato Seedlings
Same thing with two different varieties of cucumbers and 4 different varieties of yellow squash and zucchini.  Thanks to nice weather and mild temperatures, they’ve grown from this:

Cukes, Yellow Squash & Zuccs
 To this in 5 days:

My, how you've grown!
Saturday morning once chores were done, I was champing at the bit to get all those seedlings out of the seed pots and into some soil.  That requires a little work, so I began turning over the soil in the rows with my ‘Cheap-o’ Garden shovel from Harbor Freight.  Yeah, it isn’t a quality tool that will last forever, but at $5 it was priced right and you know what?  It gets the job done. 

Shovel-Ready Job
In a post from a couple of days ago, we talked about earthworms.  I discovered a bunch of earthworms while working up the rows.  Five years ago, there weren’t many earthworms at all in the garden.  Now, due to soil amendments and composting, I hit worms with every shovel.  In the post from the other day, I mentioned the clitellem.  That is the part of the worm that is nearest the head.  If you chop an earthworm in half, the half with the clitellum will likely survive and grow a new tail.  In the photo below, you can see the clitellum (raised band) on the left hand side, and that tells you that the earthworm’s head is on the left and tail is on the right.

Heads or Tails?
While we’re discussing that, I also wanted to show you firsthand the benefits of composting and amending your soil with organic matter.  I turned over soil that exposed a four inch layer of mostly rotten hay/leaves.  This organic matter does several things.  First, the organic matter retains moisture in the soil and that comes in handy during the hot, dry months that lie ahead.  Next, it gives the soil some structure and loosens things up so it doesn’t pack tightly after a rain.  Finally, I find that it is a magnet for earthworms.  It is a little hard to see, but if you look at the chopped piece of grass below, the end of it is pointing at a fat earthworm.  He’s working hard to produce castings to get my seedlings off to a healthy start.

Organic matter in the soil
In no time at all I had 24 feet worked up and began to work on the next 14 foot section.  The remaining piece of the row is currently occupied with Chioggia Beets and I’ll be harvesting that in a day or two.

Working up hills for squash
I like to sprinkle some chicken manure to the soil before pulling up the rows on top of it.  That’ll allow the roots to dig down and hit the fertilizer and then take off.

The chicken's contribution to the garden
Benjamin and Tricia helped me and we got them all planted.  Now we’ll just watch them grow and patiently wait until we have red ripe tomatoes, cucumbers and squash to harvest and enjoy.  Is gardening and tending to meat birds, milk cows, and dairy goats hard work?  You bet!  But the benefits are worthwhile, in my opinion.  I like what Joel Salatin says about it:


Friday, April 15, 2016

Turning over the Soil and its effects on Earthworms and other thoughts

I don’t have a tiller.  Instead, I have a shovel and I like to use it.  During my 50 minute commute to work, I sit on my behind.  During the hours of the day on my “real” job, I sit on my behind.  During my 50 minute commute back home, I sit on my behind.  That’s a lot of sitting and that’s not good for you.  When I get home, I can’t wait to get outside, get off my behind and do some manual labor and get some dirt underneath my fingernails.


A friend called me on the way home yesterday and asked me my thoughts on the no-till garden philosophy.  I have evolved a little in my thinking a little on this topic.  There are pros and cons to tillage versus no-till.  I used to think that I should not till, but then I began to think about this:

Proverbs 20:4
The sluggard does not plow after the autumn,
So he begs during the harvest and has nothing.

And this:

Jeremiah 4:3
For thus says the Lord to the men of Judah and to Jerusalem,
Break up your fallow ground,
And do not sow among thorns.

And then this:

Deuteronomy 22:10
You shall not plow with an ox and a donkey together.

I’m no theologian or Bible scholar, but I think that if the Good Lord didn’t want you to plow, He wouldn’t have those verses (along with others) in his Holy Word.  All that to say that the practice I now employ is that I turn over the soil one time per season with a shovel as I don’t want to unnecessarily disturb the soil structure.  I use a hoe to work up that worked ground into rows.  I work compost, leaves, and manure into the soil using trench composting, and I can see the improvement in the soil year after year.  I know someone who runs his tiller over and over and over in his garden.  His seedbed is beautiful, but the soil is almost the consistency of powder.  When a hard rain comes, the soil becomes compacted and hard – like a concrete parking lot and then it must be hoed and loosened up.  I think moderation is key, whether you use a tiller, shovel, or hoe.

When I work the soil to get ready to plant, I’ll turn one spade full of soil over and chop it several times to break it up and keep going until the row is turned.  There is a problem with this process, though.  When I do this, there is bloody carnage.  I see writhing, squirming earthworms cut in half from my shovel.  These little guys are working for me, improving my soil, aerating my soil and fertilizing my soil.  I don’t like killing them.  When I think about this, I always think about my grandfather we called "Poppy."  Poppy used to tell me the story of Albert Schweitzer and his reverence for life – all life.  The story I remember him telling is that Albert Schweitzer would walk around ants on a sidewalk so as not to kill them.  I’m not necessarily a pacifist, but I certainly don’t want to kill earthworms who are helping me improve my garden soil.


So I researched more about earthworms and found this article.  Some people erroneously think that an earthworm cut in half will regenerate into two new worms.  This is not true.  However, an earthworm cut in half will not necessarily die.  I’m sure you’ve seen an earthworm and seen a band around it.  The head of the worm is on the end closest to the band.  That band is called the clitellum.  If the worm is cut behind the clitellum, it stands a very good chance of regenerating the tail that was cut off.  The original tail will die, however, but some will undoubtedly survive and will continue working in the garden.  All is not lost when you turn over the soil.  In fact, minimal tillage allows you to break up compacted soil, turn over weeds, and work in organic matter. 

In Genesis 2:15 it says “Then the LORD God took the man and put in into the garden of Eden to cultivate it and keep it.”  Cultivating and keeping a garden is a learning experience.  It is an exercise of labor and trial.  It can also yield immeasurable joy and pleasure in addition to nutritious vegetables.  It can also be a temple in which to observe His Creation and then worship the One who created it all.


Wednesday, January 6, 2016

Feeding The Soil

Over the holidays I ate a lot.  The gumbos, rice & gravy, traditional holiday meals, not to mention the sweets and goodies that I always have trouble saying "No" to, have made my pants fit a little tighter than I'd like.  In addition to eating more 'comfort foods' during the winter months, the short days leave me with fewer daylight hours to work those additional calories off.  It is only in the spring with the longer days that I am able to bring some balance back into the "eat less and move around more" axiom of weight loss and health.

While I need to feed myself LESS, I'm always looking to feed my soil more and that opportunity presented itself recently.  A dear friend of ours had raked her yard. She's a big advocate of composting and put many bags of leaves into her flower beds, but had 18 bags of leaves left that were going to go to the dump.  She knew that I would be appreciative of them and called me.  You've never seen anyone more excited about bags of leaves!  Russ drove over in his pickup truck and loaded them in, strapping them down so they wouldn't blow out on Interstate 10.

I had the perfect spot picked out for the leaves.  The land slopes southward and the lower end of the garden stays muddy, despite the raised beds.  I determined that I would dig trenches between the rows of turnips and bury all of the leaves.  I've found that trench composting organic matter attracts earthworms and improves soil fertility.  In the summer, digging these trenches would have been a real chore, but with all of the rainfall, it was easy.

Digging a hole
I know the depth of the hole is hard to see in the photo above but I dug the trench about a foot deep and about two feet long, laying all the dirt on the side.  Then I dumped the contents of the bag into the hole.

Emptying the bag
The leaves billowed out of the hole, but I had a plan to fix that.  I jumped on top of the leaf pile like a kid, stomping the leaves down.  Like a compactor, I mashed the leaves down into the hole until they filled the 1 foot deep by 2 feet wide trench perfectly. 

Making them fit
Then while I was standing on the leaves in the hole, I grabbed my shovel and pulled the dirt over the top of the crushed leaves in the hole, filling it all in.  Then I moved over and began the hole err whole process again.  I repeated that down two 30 foot rows, filling in the space between the raised beds. Over the course of the next year those leaves will decompose and add organic matter to the soil.

Filling in the hole
Here is a photo of the finished process after I had completed the first row.  Then I moved to the row on the right.

One down, one to go!
Although it is a little hard to tell from the photo above, burying the leaves raised the level of the grown between the raised beds almost level with the rows.  In the past, the trenches between the raised rows held water during rains.  Now that water runs off into the pasture, eliminating scald damage by standing water that I had experienced previously.

Each year I rotate the position of my rows.  In year one I grown crops on a row.  In year two, the trench area becomes the row that I plant on.  This allows me to "rest the soil" each year in the same garden plot.  Next year the vegetables will send their roots down into decomposed leaves with a nice population of earthworms.  That will translate into nice vegetables for our table.  The leaves that were heading to the Landfill were used in my land fill.  Nice!

Wednesday, June 3, 2015

Digging Potatoes With Benjamin

After WAY too much rain, looking at the sickly yellow potato plants made me decide to go ahead and dig them up, as I was concerned that they would rot in the wet ground.  Benjamin got his shovel and a crate and we went out to where I have a 45 foot row of potatoes planted.  Back in February, we planted them and now is the time that we normally dig them up.

We started in the new beds that are in the yard.  It is new land that I've been incorporating lots of organic matter like chopped up leaves and hay.  It is in a higher location than in the garden and that was beneficial this year due to all the rain. We didn't need the shovel after all.  The ground was wet and pulling the plant uprooted most of the potatoes out of the moist ground.  The spuds that didn't come up with the plant were easily found with our hands.

Uprooting Potato Plants to expose the Pomme de Terre
The potatoes were of various sizes, but the yield wasn't near what we produced last year. I attribute lots of that to all the rain.  There were tiny, undeveloped potatoes on many of the plants that never developed due to (I think) the yellowed, sickly plants brought on by an overabundance of rainfall.

Nice Potatoes
One bad thing about our potato harvest was fire ants.  The rain caused fire ants from far and wide to congregate on the highest place on the property - the hilled up row of potatoes.  As we dug, we had to quickly pick them up and put them in the crate and then slap our hands to remove the biting fire ants. Benjamin and I both had numerous bites.

One positive thing was that there were other creatures besides fire ants in the soil - earthworms.  That tells me that our incorporation of organic matter amendments are doing a great job in bettering the soil.  Did I say earthworms?  I meant to say enormous, gigantic, monstrous, mammoth, gargantuan earthworms.  The biggest I've ever seen.

Huge earthworm
Benjamin picked up one of them to show you.  I am not exaggerating when I tell you that this earthworm was a foot long!  We put him back in the potato bed to continue his work in the soil.

Enormous!
This was the biggest potato that we dug up out of the ground.  It is a nice sized spud.  I particularly like the smaller round ones that you cook whole along with some green beans and some bacon or tasso for flavoring.


When we were finished digging the row, we had a nice crate full of potatoes. Nothing compared to last year's crop, but nothing to scoff at either.  I'll plant more this fall.  We learned that if you want to make the potatoes last, you don't wash them, so we'll dust them off a little and bring them inside and eat on them for a while.

Crate of potatoes
A couple days later, we dug up the four rows of potatoes that we had planted in the garden.  Since the garden was at a lower elevation than the long row in the yard, many of the potatoes had rotted in the ground.  When we put our hands in the soft soil (or mud), the potatoes were soft, mushy, and stunk. We ended up getting a 2 1/2 gallon bucket of smaller potatoes from those rows when all was said and done.  You can't really do much about the weather except complain about it.  I'll try to purchase some topsoil to build up the soil in the garden to avoid this happening in the future.  We'll enjoy the potatoes we did harvest.  That's for sure!

Wednesday, September 17, 2014

Playing in the Dirt

I posted several days ago about our difficulties with bugs or little green worms eating all of the leaves off of the broccoli, cauliflower, Brussels sprouts, and cabbage seedlings that I had started from seed in seed pots and was about ready to transplant.  Not to worry. I got busy and planted the seeds directly in the ground. We'll get the work done one way or the other!

I have several old round bales of hay that were given to me and I try to keep the garden covered with hay at all times.  I use it as a mulch around the growing plants in order to retain soil moisture and as a protective covering over the ground when it is fallow in order to discourage weed growth.  It is not 100% effective, but it crowds out about 90% of the weeds.   I got out there the other day and pulled out what little weeds were growing in the rows and then planted (re-planted, if you will) the broccoli, cauliflower, Brussels sprouts and cabbage that I lost to pests.

Some of our 30 foot rows are planted
I gave the newly planted ground a liberal sprinkling of water and in no time at all, we had little plants popping up like crazy!  Although the picture below is so blurry it looks like I took it with a potato instead of a camera, it evidences the happy little plants jumping up out of the ground with such vigor, that it makes me get excited.  I love watching things grow!

Plants Popping up!
But let's back up a bit.  I want to show you a practice I've incorporated that seems to be working.  I don't mind sharing things we've tried that haven't worked.  This is a trial and error farm and we learn from our mistakes all the time.  One of the things we try to do is amend the soil with as much compost, leaves, coffee grounds, and other organic matter so that we are constantly building and improving the soil.

For two years now I haven't tilled the land so that I don't disturb the soil structure. Throughout the year I keep the furrows between my rows filled with leaves, hay, and grass clippings.  Over the course of the year, it all decomposes.  I'm holding some of the material in my hand below.  If you were to smell it, it would smell musty, earthy, rich, and aromatic.  In fact, if you were a plant, you'd want to run your roots through this stuff.

A real handful (of decomposing material)
When I'm ready to plant, I gently take this material and hoe it up on top of the row, chop it up a little bit with my hoe, and then plant directly into it.  Let's take a closer look: 

A Haven for Earthworms
If you take a quick glance, it appears the ground is moving.  A closer inspection shows a plethora of squiggling earthworms.  I spot five nice earthworms in the photo above and that is just what is exposed with one hoe-width.  In the past, I could take a shovel and dig and not be able to locate a single worm.  Now, if you want to go fishing, you don't need to dig very far.

Earthworms are great.  They tunnel, providing aeration for the soil.  They poop, providing fertility for your vegetables, building a great growing medium for healthy plants.


Now I'll just re-fill the furrows between the rows with leaves, hay, grass clippings, coffee grounds and anything else I can get my hands on.  Repeating this process over the years has improved the quality of my soil.  Adding organic matter and keeping the ground covered with hay and mulch makes the ground so much easier to work.  It doesn't pack into a hard pan like it used to after a rain and it enhances the medium for growing vegetables AND these guys:


So after I had a few of my rows ready to be planted, I got out my seeds.  Two of the interesting new varieties I'm planting this year are Purple Cauliflower and Green Cauliflower.  I got these heirloom seeds from Baker Creek.  I can't wait to see how these grow.  I always enjoy a visual feast in the garden and then a gastronomical feast!  I'll be sure to keep you updated with how these grow.

Colorful Cole Crops
I label all of my rows with the crop name and the date planted so that I'll know what is planted on each row and when it will be ready for harvest.  It is very important to label the rows as you go since broccoli, cauliflower, Brussels sprouts, and cabbage seeds all look exactly the same.  It further complicates matters when you plant several different varieties of the same crop.

Cauliflower Seeds
Swiss Chard and beet seeds look the same, too.  I have Bull's Blood Beets, Golden Beets, Red Mangel Mammoth Beets and Swiss Chard planted. 

Swiss Chard Seeds
I used a stick to make a slight trench in the top of the row, seeded the row and then sprinkled 1/8 inch of topsoil over the seeds.  Then I watered the dirt to start the seed to swell and then sprout.

Ready, Set, Grow!
It is always so interesting to me how a seed can sit dormant in a package or in a bottle for years.  It waits, patiently, for the right conditions to arise.  When those conditions are present, the seed awakens from its sleep and grows, producing a crop and producing seeds to reproduce itself.  It's a miracle the way our Creator designed things to provide for us.

Indeed, the LORD will give what is good, And our land will yield its produce. Psalm 85:12

Thursday, February 27, 2014

Planting Sugar Peas

Sunday afternoon before the rains came, I took advantage of getting our sugar snap peas planted on a 30 foot row.  We love these things.  It is the closest thing in the garden to candy.  They are sweet and even kids love them.  To me, they are best raw, but steamed in butter ain't half bad.  I have a cattle panel that I use for a trellis and they will send out little tendrils that grab hold of the trellis as they grow upward. They'll bloom beautiful sweet pea blooms that smell great and attract bees.

So if you want to plant, you've got to get your hands dirty.  Nothing wrong with that. Here's Benjamin holding up a handful of rich soil.  In fact, we love dirt around our place.  It is no coincidence that the dirt forms a heart shaped pattern in his hand.  If you could look closely, you would see the dirt is teeming with tiny organisms, root hairs, organic matter.  It's healthy.  It's ALIVE!

We love dirt!
Another sign of healthy soil is when you find one of these boogers in there.  In the past, we couldn't find an earthworm.  Now you can't dig a hole in the garden without finding them.  It is a testament to not using pesticides and herbicides and using compost and organic matter to amend the soil.  The worms come, dig, feast on good things in our soil, aerate the soil, lessen compaction, enhance drainage, and then poop and their castings fertilize our crops.  What a deal!  I don't have to pay them a cent for all that work.

Not a gummy worm
So Benjamin and I made quick work of digging a trench 30 feet long and 1/2 inch deep and got some seeds out that we've stored in the freezer.  I also used some open pollinated seeds that I saved from our crop last year.  Seeds are cool in that they're essentially dead - dormant, but miraculously, if put in the soil and watered, they'll awaken (sometimes after years) to produce good food for you.

Pass the peas, please
I dropped them in the dirt about two inches apart and then got ready to cover them up.

Let's get ready to rumble...
The little roots you see are from neighboring shallots, garlic chives, and cilantro that are all growing nearby.

Our roots run deep.
In fact, you can see the garlic chives and shallots to the left.  Those are hard to beat in an omelet with some fresh eggs.  In the bottom right you can see some cilantro that came up on its own from last year's seed. That is great in pico de gallo or cooked with eggs as well.  I have a ton of cilantro seeds, if anyone is interested. When it warms up, cilantro bolts (flowers and goes to seed) quickly, so you want to plant them and eat them fast.

If you notice that red thing in the middle of the photo below, I have a story about that.  I was running around like a chicken with his head cut off the other day looking for my Leatherman pocketknife as I needed to cut some baling twine.  A gentleman pulled into the driveway and asked what I was doing.  I told him.  He said that he had the perfect thing for me.  He grabbed an eight inch butcher knife out of his truck that had red duct tape wrapped around the handle and told me that he wraps red tape around all his tools so he can find them easily.  I told him, "Good idea!"  As I handed it back to him, he said, "It's yours."  He told me that he paid 10 cents for it at the Goodwill Store and he knew I'd make good use of it.  AND I DID!  I used it to dig the trench for planting our peas and it worked like a charm.  And since it has red tape on it, I won't be losing it!

Lets cover 'em up
I don't want to disturb the soil structure so I try to no till as much as possible.  The red-handled long knife was the perfect tool for planting peas and the gentleman's timing for coming up my drive was most fortuitous. In fact, in about 68 days when these peas are ready for harvest, I'll repay him for his kind deed with some sugar snap peas.

Thursday, March 21, 2013

Earthworms!

We discussed earthworms the other day when I was working up some ground to plant potatoes and green beans.  I've been doing a little reading on earthworms and their benefits.  You see, when we first started gardening in this soil we had no earthworms.  The ground was packed, compacted, with lots of clay.  Every once in a while, when turning over the soil, I'd see a white grub, but no earthworms.  Now, I can't turn over a shovel-full of soil without finding an earthworm.  That is a good thing!
As the worm turns
Here are just a few benefits of having earthworms in your garden: (from All you want to know about earthworms & more...)
Earthworms will improve your soil in numerous ways:
  • They help the soil to drain better - less runoff,
  • Their tunneling improves soil aeration and helps breakup hardpan and compacted soils,
  • They bring up minerals from deep in the ground to the surface where plants can use them,
  • Their tunnels allow roots to go deeper to nutrients they might not otherwise have gotten to,
  • They help compost residues and waste products,
  • Their castings (earthworm poop) improves fertility of the soil & neutralizes the soil
I could go on and on, but you get the point.  You want these guys in your garden.  In the photo below, I captured an earthworm tunnel intact.  Look right above the right-hand side of the worm.  See the tunnel?  That tunnel is key to the first four bullet points I listed above.
Earthworm tunnel
So how do you get these guys on your land?  This is how I did it - I fed my soil, and continue to feed my soil, all the organic material I can.  I incorporate as many leaves, sawdust, grass clippings, shredded paper, vegetable and fruit peelings, coffee grounds, etc.  Build your soil.  Like the movie "Field of Dreams" says, "If you build it (your soil), They (the earthworms) will come!"

I collect coffee grounds from work and bury it between the rows each day to help improve my soil.  In the photo below, if you look closely, you can see that the worm is coming directly out of some composted coffee grounds.  This guy likes Community Coffee - Cafe' blend.  He takes it black with no cream or sugar.
 
Coming off of a coffee break
If you look closely above you can see a band that is about 1/3 of the way up the worm's body.  That band is called the clitellum.  The worm's head is always closest to the clitellum.  The clitellum secretes the mucous that makes worms slimy.  If you've ever baited a hook, you know what I'm talking about. 


I learned that earthworms don't have eyes, but have cells that are sensitive to light and touch and they also breathe through their skin.  The neatest thing about them is that they are working continually to improve my garden and I don't have to pay them.  They work for free!   This is why I try to be careful when turning over the soil.  I don't want to kill these guys.  I did learn, though, that if you cut them in half, the rear half always dies, but the front half (as long as it contains the clitellum and 10 rings back) will regenerate and live.  That's good news, but I still try not to cut them.

Hard at work
 Like Mike Rowe's Dirty Jobs television program, an earthworm's work is not pleasant.  The photo below shows a couple of worms breaking down the remains of a chicken that was killed that I buried in the garden.  They enable that dead chicken to become useful to the plants in the garden.  They also then produce the castings (poop) that is made up of organic matter and soil that becomes food for the plants and beneficial bacteria in the soil.  What a neat cycle!
 
Dirty Jobs
Earthworms are a good sign that your soil is healthy or is in the process of becoming healthy. When your soil is healthy, you grow healthy vegetables.  When your vegetables are healthy, so are you!  And to think, it all starts with good dirt and the work of the lowly earthworm.
Related Posts Plugin for WordPress, Blogger...