Showing posts with label saving seed. Show all posts

Tuesday, July 18, 2023

Save it for a Rainy Day

Do you remember a few short years ago when toilet paper was in short supply because everyone was hoarding it due to a respiratory virus?  Then there was a chip shortage and people couldn't buy or repair their cars.  I work for an insurance company and body shops are still having difficulty finding some parts.  Broken vehicles sit unrepaired and status shows "NO ETA."  My wife was in the grocery store last week and they were having a brown-out due to limited electricity.

As I think about these things, if toilet paper is in short supply, there are other (albeit uncomfortable) alternatives.  If we can't get computer chips or car parts, well, there are worse things.  With lack of power, yes, things get uncomfortable.  But what happens if the grocery store shelves are empty?  With the "just-in-time" inventory method in place, stores don't have a big inventory sitting in the back room.  What would you do?  Have you thought about it?

I have.  You might say, "We'll plant a big garden!"  Stellar idea.  But what happens if you can't get seeds!  THIS ARTICLE tells us that during the pandemic, the Michigan governor banned seed sales.  What if there was a run on seeds and there was none to buy?  "Don't eat your seed corn" is a valuable life principle.  Every seed that you have can either be eaten OR saved to plant for next year's crop.  Make sure you always save seed for next year.  

We do that.  First, you must ensure that you are buying non-hybrid seed.  We buy our seeds from www.rareseeds.com and save seeds from our crops every year.  It's just a wise thing to do.  We've just completed saving a few items.  Here are some blackeyed peas:

These are some black turtle beans:

These are some Ozark Razorback peas (I see I have some blackeyed peas that jumped into this bowl):

These are my new favorites - Blackeyed Butterbeans:

Here are some purple hull peas:

And finally, some purple teepee beans:

Here they are.  I'll store these away and date them.  I did an experiment and planted some Ozark Razorback peas that were 11 years old.  The germination was down, but I anticipated this and planted them super close.  They grew and produced!

It's always good to be prepared and save seeds in the event you can't get them.  You can save some money by doing this, too!  Then, if you have too many, you can always eat the remainder that you don't need for next year's seeds.  The fun thing about it is that you can always trade your seeds for other people's seeds that you don't have.  I like to try new things in the garden.  Time to check your seed inventory for the fall crop.  Save those seeds!  

Sunday, April 16, 2023

Saving Broccoli Seeds

After we harvested the broccoli main head and picked the florets every day for weeks, it was time to let the broccoli go.  It went to flower and cascades of yellow flowers filled the broccoli row.  The honeybees buzzed around the broccoli, moving from flower to flower.  Soon the plant filled with pods that were at first green, but dried out and turned brown over several weeks.  Since we grow open-pollinated, non-hybrid, heirloom plants, we can save the seeds from year to year.  For most plants, its pretty easy to do.  I clipped off the tops and brought all the broccoli seed heads into the garage in a bucket.


Broccoli is a cole crop.  The seeds look like cauliflower, cabbage, and turnip seeds.  They are very small.  Broccoli seeds are in pods that are about 2 1/2 inches long.

There is definitely an easier way to do this, but the way we did it was like this.  Russ and Benjamin sat in the backyard with me and pulled pods off.  Once we had four or five pods in our hand, we rubbed our palms together over a big blue bowl until the dry pods disintegrated, leaving the seeds exposed.  We tried our best to pick out the chaff.  As you can see, we're collecting a pretty good bit of broccoli seeds, but a lot of chaff, too.

I went inside and got a fan and turned it on high.  Then I poured the seeds into the bowl from a bucket.  It took some trial and error, but soon had it sort of fine tuned where the chaff would blow away and the heavier seeds would fall into the bowl.

We could have cleaned the seeds more with additional time, but we got the seeds about as good as we could, considering the time and effort involved.

I poured the saved seed into a dark colored bottle and labeled the seeds, "Waltham Broccoli Seeds, saved Spring 2023" with a Sharpie on freezer tape that I affixed to the bottle.  Then I put in our saved seed box.  This fall we'll pull these out and plant.  Since they're saved, I'll generally plant a little heavy as I haven't tested germination.  Always good to plant heavy and thin out later than not have enough coming up in the rows when you need.

Wednesday, February 15, 2023

The Broccoli is Almost Done

Every other day, we've been enjoying broccoli florets picked from the broccoli that is still out in the garden, soldiering on.  We add it to fried rice and soups.  Last night we roasted it in the oven with minced garlic.  After the main head is picked, the broccoli just keeps on producing.  I would estimate that if you weighed the main heads we picked and then weighed the sum total of all the florets we've picked, the florets would weigh more - maybe double.  

The Good Lord created plants to grow, flower and produce seed, and our broccoli is doing just that.  The broccoli I'll show you photos of today is called Waltham Broccoli.  It is an heirloom, non-hybrid created in 1954.  Here you can see one of the florets I was speaking of.  We normally try to harvest these before they go to flower.

If you wait one more day, that tight floret will spread out like the one in the photo below and will get ready to flower.  We had weather in the 70's today.  That will really get the broccoli growing quickly and have all these florets opened.

Here is what the broccoli looks like in one more day.  Most of the flowers in the floret have turned to pretty yellow flowers.  These flowers heavily attract the honeybees that live in our column.  They'll be all over these flowers in no time at all.

Then a metamorphosis occurs.  Those flowers produce pods that look kind of like green beans.

Those pods, when mature, can be dried and the seed inside will be saved for planting next years' crop of broccoli.  Once the broccoli pods have turned brown, I'll harvest the broccoli seed.  When I harvest the seed, I'll store it in a dry, dark place.  Then I'll have broccoli seeds for sowing this fall.

Monday, May 2, 2022

Saving Spinach Seeds

So here's how we save spinach seeds.  Saving seeds is a cool thing to do.  We purchase Heirloom Open-pollinated seeds to enable us to do this.  You can't really do this with success with hybrids.  This Galilean Spinach seed I'm saving are coming from seeds I actually saved last year.  We'll see how long we can keep this going without buying new seed.

Galilee spinach is from the Holy Land.  It is delicious spinach.  Once it starts warming up, the spinach plants quickly bolt.  It flowers and goes to seed.  I let it dry on the stalk until it is brown and dead-looking.


 I gently pick up each stalk so the seeds don't fall off.  They are very dry, so they are fragile.  I did drop some, but perhaps they'll come up volunteer next year.  Can you spot the seeds on the stalk?

Once I pluck the seeds off the stalk I put them in my hand so you can get a better look at them.  The seed has two spines on either side of it.  What do you think those spines are for on a Galilee Spinach seed?


I think it is a seed distribution strategy designed by God.  Look at the seed sticking in my finger below:

If the spines stick in my finger that easily, how much easier to you think it would stick on your socks or your pant leg?  Or animal's fur?  Anyone or anything passing by the plant would inadvertently pick up these seeds and distribute them to a new location, thereby furthering the range and survivability of the plant.  It is brilliant, really!

I was unaware that spinach seed did this.  Growing up on the farm, I remember a noxious weed called a cocklebur that made numerous seeds that employed this same distribution method.  The cocklebur was FULL of spines on all sides.  It spread all over the place.  It was not a good thing to have in your soybean field.  At least Galilee Spinach is good to eat!

When I had collected quite a bit of seed, I still had some work to do.  The seed also had stems and leaves mixed in.  I'd like to do something about that.  So I thought about Gideon from the Bible that was threshing wheat.  I figured I'd do the same thing, but I used a fan.

I turned the fan on high and placed the seeds in an egg carton.  I would lift the seeds, stems, leaves and trash and drop back into the egg carton.  The heavier seed fell back in the egg carton, while the lighter stems and leaves blew away.

While not a perfect seed cleaning machine, it is good enough for me.  Mostly what I'm left with is Galilee Spinach Seed that I'll plant this fall.


I labeled a dark colored jar with the variety and date and poured the saved seed into the jar.  I'll store the jar in a cool, dark location.

This fall I won't have to order spinach seed.  I'll pull out this jar and plant.  We'll harvest delicious spinach and then save the seed again.  A beautiful cycle we'll repeat year after year.

Wednesday, October 13, 2021

Saving Okra Seed At Season's End

We're at the very end of okra season.  It seemed like a short season this year.  Usually they produce longer.  I asked Tricia not to pick some of the biggest, prettiest pods on the stalk as I wanted to save them for seed.  You know, that's one of the hard parts of seed-saving - Saving rather than eating the crop.

So we allowed the okra pod to completely dry out on the stalk.  These are Beck's Big Okra, an old heirloom variety.  I had never saved any seeds from them.  My favorite are Clemson Spineless and we also plant Burgundy Okra for some color in the okra patch.  You can see the okra pod is very dry.  In fact, it has split open, and you can see the okra seeds exposed.  If these had been left any longer, some of the seeds would have popped out on the ground, perhaps producing "volunteer" okra next year.


I brought the dried okra pod inside (away from the mosquitoes) and put it on a plate.  I peeled back the okra, allowing the seeds to roll out on the plate so they wouldn't get lost.  A few fell on the floor and rolled off, causing me to search like crazy to find.  I was doing an experiment to see how many okra seeds I could get out of one pod.


Here are a few of the seeds shown close up.  These seeds are very hard.  When it is time to plant them in the late spring, I soak them in water for a day to soften them up to reduce the germination time.


So when I counted all the seeds from that pod, do you know how many I got?  119!  One hundred nineteen seeds.  I'll put those in an old vitamin container where they'll stay dry and in the dark until next year.  I'll plant maybe a quarter of those next year along with some Clemson Spineless and Burgundy okra.  I need to plant a lot more next year to ensure we have enough frozen, chopped okra for "Gumbo Season!"

Sunday, August 26, 2018

Saving Seeds from Our Glass Gem Corn

This afternoon Tricia and Ginger the cat helped save seed from our Glass Gem Corn.  Glass Gem Corn was one of those experimental things I tried.  It is a sweet corn that makes an ear with multi-colored kernels.  While not a prolific producer, the ears were stunningly beautiful!  I ate one ear raw out in the garden, but to be perfectly honest, we didn't eat a single ear and I ended up drying them all for seed.  What I found was that if you picked the Glass Gem Corn when the silk turned brown, the kernels were all white/light pink.  Conversely, if I left them on the cob to ripen, they turned out with beautiful colors, but were too ripe/hard to eat.  Soooo, they all became seed corn.  We dried them on the patio for several weeks and then twisted the kernels off the cob.


Different cobs had varying amounts of color.  Some were multicolored and some were mostly yellow.


Twisting the kernels off the cob, you could see a wide assortment of colors.


I selected a representative sample from all of the color groups I could find, from red, yellow, pink, purple, green, blue, and white.  I'm sure there were different hues that I just didn't have the patience to pick out.


I stored all of the dried kernels of Glass Gem Corn in a container where they will sit in the dark in dry storage until next year, when I'll pull a few out and plant maybe a row of them.  I like to plant a few novelty items each year.  They are beautiful and a nice conversation piece.


Tuesday, June 21, 2016

Dill or No Dill

In THIS POST from back in March,we showed you how we dried our dill that we grew in the garden.  It was our first successful venture in growing dill and it was a success.  Tricia has used both the fresh and dried dill to make some homemade pickles that fill the shelves in our pantry as well as the fridge.  She also used some of the fresh dill to cook with some carrots.

In order to make sure that we have plenty of dill for next year, I wanted to be absolutely certain that I saved enough seeds.  With the amount of seeds that the dill produces, I didn’t think that was going to be a problem.  Dill blooms in a big cascade of little yellow flowers all over the tops of the plant that contrast against the green plant.

Fresh dill in bloom
Here is a close-up shot:


Each one of those flowers makes an individual seed.  You can see in this photo how the flowering ends and then you can see the swollen part that becomes the seed.


I simply let them dry in the garden on the plant until the plant dies and turns brown.  I check the seed heads each day as I don’t want the seeds to get over-ripe and then shatter on the ground.  Here’s what it looks like when the seeds are completely dry and ready for picking.

All dried out
The dill seeds kind of hang, waiting to be gathered for next years’ crop. 

Dill seed dried and ready to be removed from the stalk
I simply take my fingers and gently rub the seeds and they fall off into a container or into my hand.  The seeds give off such a nice fragrance!  They actually smell a little like licorice.  Some might think that is not a nice scent, but I do.

A handful of dill seed
Just to make sure that the seeds are totally dry, I collect them in a dish and set them on the window sill to dry a little more off the stem.

Further drying on the window sill
We won’t know how good the germination will be until next year, but I always like to save seeds and build my seed inventory.  A bird in the hand beats two in the bush OR Dill Seed in the hand beats thousands on the bush!

Add caption

Other than the photos you see above, I’ve saved lots more dill seed.  So much so that I’ve been wondering what I can do with all this?  Well, other than using dill for making pickles, I learned that you can do the following:

v  Sprinkle dill seeds on top of boiled new potatoes,
v  Use them as a topping for homemade bread similar to what you would do with poppy seeds,
v  Mix dill seeds with butter,
v  Sprinkle them on top of fish dishes,
v  Use dill seeds as a salad topper,
v  Add dill seeds to cooked cabbage,
v  Add them to potato salad or coleslaw.

Finally, I learned that dill seeds can be used as an aid to relieve indigestion if you chew on them.  According to what I read HERE, the conqueror Charlemagne had dill available at his banquet tables so that his guests who over-did it while feasting could benefit from dill’s stomach-healing properties.

We have plenty of dried dill and dill seeds.  That’s a good dill deal, in my book. 


Tuesday, September 1, 2015

Saving Bloody Butcher Dent Corn For Seed

In THIS POST from about 3 weeks ago, we discussed the method we used for drying and saving our Bloody Butcher Dent (Field) Corn for seed.  We got this heirloom seed at a seed exchange and this corn is primarily used to grind into cornmeal or grits.  How cool would that be to have a warm bowl of pink grits for breakfast?  Well, the amount of seeds given to me was not in an quantity that allowed for eating - this year.

Learning to be patient is a good thing.  Don't they say that good things come to those who wait?  I figured that I would grow the corn for seed this year and next year put in a patch of Bloody Butcher seed corn from our initial crop that I'll use specifically for grinding into corn meal or grits.  I had never saved corn for seed before so it was interesting to learn how to do it.  With our high humidity, I was a little concerned that the seed wouldn't dry, but I took it inside when rain threatened and kept it on the window sill.

Bloody Butcher Seed Corn Drying
You know that the corn is dry when you can pick up the cob in your hand and twist it, and the kernels pop out easily.  Three weeks ago you could not do this, but lo and behold, after leaving them out on the patio in the hot, dry summer air (except on rainy days), they dried quickly - quicker than I thought.  When I passed by the other day and twisted, the corn popped off of the cob easily.


I think this corn is real pretty.  I decided to do a little quality control and I sorted through each and every kernel, inspecting it for damage.  Some of the kernels had bug damage.  I suspect ants had climbed up the stalk and eaten the germ.  The germ is the embryo of the corn kernel, and it is not going to sprout if the germ is gone.  Those kernels that were damaged were discarded into the compost pile, while the good seed was put aside.  I also removed some of the silk that remained mixed with the seed and was left with a nice sampling of seed corn for next year.


I'll put the saved seed into a container that held nutritional supplements and vitamins at one time, and they'll be stored in the container until it is time to plant next year.  I save those little silica gel packets that come in everything from vitamins to shoe boxes and I'll put a couple of those packets in each container of seeds I'm saving.  The packets are used to eliminate moisture and humidity, and I figure it will be very helpful in keeping my seeds in good condition until next Spring.   

Image Credit
I'm pretty pleased with the seeds that we were able to save.  Although the seeds look to be in real good shape, we won't know if our seed saving venture was successful until we put them in the ground next year and see what kind of germination rate we get.


Hopefully, we'll be able to post an entry next summer, showing a nice bowl of pink grits for breakfast, courtesy of Bloody Butcher Heirloom Dent Corn, evidencing the fact that good things do, in fact, come to those who wait.

Thursday, January 8, 2015

An "Insurance Policy" for Seeds

Right about this time each and every year, the mailbox begins to fill with Seed Catalogs. I truly enjoy sitting in front of the fireplace, looking through each one and deciding which varieties I'll order and try.  Before I order any seed, I inventory all of my purchased and saved seed.  That helps me to determine what I'll be needing for the Spring Garden.

We purchase open pollinated seed and that allows you to save the seed year after year.  That is opposed to hybrid seed.  You can save hybrid seed, but generally the plants will not be the same plant or produce the same fruit as the original plant.  In my limited experience doing this, the yield will be diminished and the produce quality will be poor.  I save some of my heirloom seeds in sealed containers in a dark, dry place in our house.  I save some of my heirloom seeds in sealed containers in the freezer in the garage.  I don't want to put all my eggs in one basket, so to speak.

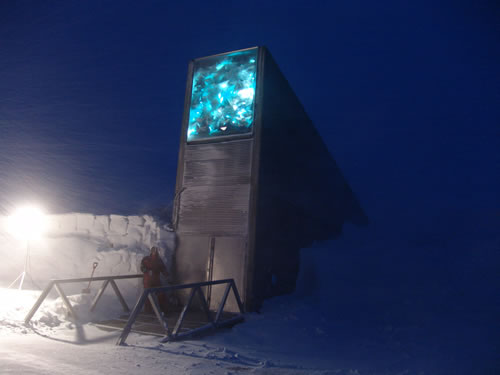
It is a very real concern that I could lose all of my seed inventory due to natural disaster, spoilage, or some other tragedy.  What would I do?  I was reading about this and learned that for this very reason, Norway built a Seed Vault called the Svalbard Global Seed Vault to insure against the risk of losing seed.  Just like animals, plants can go extinct for one reason or another.  You can read about it Here. It is very interesting.

Norway built the seed vault for $9 million USD and it is located 390 feet inside a mountain on Spitsbergen Island.  The seed is heat sealed is special packages and is stored at -0.4 Fahrenheit. Scientists estimate that some of the seed could remain good for thousands of years.  There are thought to be 1.5 million distinct seed types in existence.  There are currently over 20 million total seeds of 770,000 distinct seed samples stored in the vault, containing roughly 1/3 of the world's major food crops.

Here is the entrance into the seed vault:

Image Credit
It is free to store seeds in the vault with Norway and the Global Crop Diversity Trust bearing the burden for storage costs.  With all of the GMO seed that is patented and owned by Agricultural Concerns that prevent you from saving seed, I think it is a good idea to preserve heirloom varieties. Here is some additional information on the Seed Vault.

Image Credit
I'll continue saving my seed like I currently do.  I won't be sending any seed to Norway, but it is nice to know that people have taken out an "insurance policy" on seeds so that we won't lose the diversity of the seed bank.

Now, I need to get busy and do my annual seed inventory of my seed vault...

Monday, April 8, 2013

Asparagus

My mom gave me some asparagus roots years ago which I planted in my garden and they still make asparagus today.  We like to eat asparagus.  By the way, what is the plural of asparagus?  Surely it is not asparaguses!?  I'd bet it is asparagi, but it would probably just be safer and easier to say, "I ate 5 stalks of asparagus."

Asparagus is a plant indigenous to Europe and eaten by people worldwide.  If you plant them one time in your garden, they come up every year.  You've got to be very alert and check them every day in Springtime as you can only eat the young shoot.  If you let it get too big before cutting, it gets "woody" and is not palatable or fit for eating.  See in the picture below, there are two shoots ready to be cut and eaten.
Fresh asparagus ready to be harvested

Asparagus are easily recognizable by kids who watch Veggie Tales as one of the main characters is Junior, the asparagus.

  
Junior?  Is that you?
I can eat them raw right out of the garden.  They are delicious grilled, though.  I've even seen them wrapped with bacon and broiled.  You can't go wrong with that.


If you don't pay attention and harvest the young shoots to eat, the shoots quickly become what I call ferns.  The shoot grows upward, sends out branches that open and fall to the side.  They flower and make little bell-shaped flowers and produce little red berries on them.  Careful though - the berries are poisonous to humans.  In the fall, the foliage turns yellow and I generally cut it back.  Come Springtime, you'll have more asparagus!
Foliage of the asparagus plant
Here's an unrelated item that I wanted to share - next year's Sugar Snap Pea seeds.  I let the remaining peas turn brown on the vine and dry.  Prior to pulling the vines down to make room for the spring green bean crop, I pulled the pods off and let them continue to dry in a can.  This weekend, I shelled the peas.  I'll store them and use them for seed this fall.  
Sugar Snap pea seeds for next year!
I always like to save some seeds for next year rather than eating every single thing produced from the garden.  Don't eat your seed!  Think ahead for next year.
Related Posts Plugin for WordPress, Blogger...