Tuesday, August 25, 2015

Putting the Fall Garden In

It is hard to imagine as I looked at the thermometer on our car showing an outside temperature of 105 degrees in the church parking lot on Sunday, but it is indeed time to start getting the Fall garden planted.  This weekend I made a good start by weeding the areas that I want to plant and then sprinkling some organic fertilizer over the top.

Then, trying something new this year that I learned from Herrick Kimball's Deliberate Agrarian Blog, I'm planting on 30" rows this year.  I think they'll give the plants more room to grow than the 18" - 20" rows that I normally pull up.  As I look at the seed spacing recommendations, the wider rows will give me the ability to plant two furrows on top of each row, giving me a side by side spacing that makes better use of the space I have in the garden.

Using baling twine that I salvaged off of the round hay bales, I measured and marked off the 30" row width and shoveled out the dirt between the rows, allowing the width of the shovel for the walkway between rows.  I may widen the walkway in further years to the two shovel-row width that Mr. Kimball suggests, depending on how this works.  I used a hoe to lightly work the soil and then used a flat rock rake to smooth out and shape the row.  I was pleased with the way the new rows turned out.

One bed ready
It was hot and humid, though, and I completely soaked two shirts before noon just working up the two rows you see below.  I grabbed a stake that I used to stake up some pepper plants a few years ago.  Amazingly, it hasn't rotted yet.  It is the perfect tool to make small trenches in the top of the row measuring exactly 12" apart. Perfectly priced, too!  You can see those indentations in the row on the left below:

The Second Bed is ready with trenches for seed planting
The first plants that I need to get planted before it is too late include some of the cole crops:
  • Broccoli
  • Brussels Sprouts
  • Cabbage
  • Cauliflower
I plant several different types of each of the above.  For example, I like to plant 'regular' broccoli' and Romanesco broccoli, 'regular cauliflower,' green cauliflower and purple cauliflower.  For starters, I wanted to first plant some bok choy.  Bok Choy is a chinese cabbage that is delicious stir fried.

Chinese Cabbage (Bok Choy)
Because they are in the same family, you must be careful with your record-keeping and labeling your rows as all of the seeds look exactly the same:

Bok Choy Seeds
The seeding instructions are pretty much the same and require the seeds to be planted at a seed depth of 1/8 inch and 12 - 18 inches apart, but I plant them only 4 inches apart to ensure that germination is good.  Once the plants are thriving, I'll thin them out.  I can never bring myself to destroy a perfectly good plant, so I always dig the ones out that I need to thin and move to another location to grow.

I'll continue to plant other fall crops as the days go by, including beets, kale, Swiss chard, turnips, radishes, lettuces, mustard greens, sweet peas, parsley, cilantro, and spinach.  Last night we had a terrific storm that blew through, depositing 2 inches of rain on the garden.  That should have all the seeds swollen and sprouting soon. Unfortunately, it knocked out our power last night for a few hours and I wasn't able to post the blog post on Breaking Clarabelle until the next morning.  

Who knows?  With a local economy hurting due to oil & gas prices and a wildly fluctuating stock market, perhaps seeds and a garden full of fresh vegetables is the smartest investment in my portfolio!  We're optimistic about things.  Cooler weather, lower humidity, and a thriving Fall Garden (hopefully) are on the way...


Breaking Clarabelle

Clarabelle is our little Jersey heifer that was born on June 20th.  She is a cute little thing, full of personality.  Each night we separate her from her mom, Rosie, so that she doesn't get our milk and she plays games, running from us while kicking up her heels.  She is an affectionate little thing and enjoys to have her neck rubbed.

It is easier to 'break' a calf to lead as young as possible and we decided to start breaking her on her 2 month birthday.  I had a goat halter on her, but she is growing so fast that it doesn't fit her anymore, so I purchased a 'breaking halter' specifically for this task.  It has a special ring that allows the tension to be released quickly.  I'll show you why this is important in a minute.

Calves, like people, can be headstrong, stubborn, ornery!  If I put the halter on Clarabelle and tried to make her walk, she would dig in her heels and resist, causing me to pull and strain.  Eventually I'd be able to drag her, but there is an easier way. You just have to be patient.  It doesn't happen overnight. I halter her and tie her about head-height, leaving about 12-18 inches slack in the rope.  We make sure that we're nearby and constantly checking on her as we don't want her to fall and potentially choke herself.

Clarabelle doesn't like this at all!
Clarabelle likes her freedom.  She doesn't like being tied up and try as she may, the Chinaberry tree she's tied to is not going to move.  That's the point.  "Breaking" Clarabelle means exactly that - we are breaking her will.  She will understand, over time, that resistance is futile.  She is not going to win in a tug of war against a tree...


Or a fence post, for that matter.  Each day we'll leave her tied for an hour or so. While she's tied, we talk to her calmly and rub her down, massaging her neck, petting her back, touching her legs and belly.  She comes to look forward to this just as you would if someone would massage your back everyday at a certain time. Despite the lack of freedom caused by the rope, she at least can look forward to the treat of rub-downs and pleasant talk.  The first several days, she pulls mightily against the immovable object, straining with all she has.  Eventually, she doesn't pull quite as tight.


After a while, she doesn't pull at all.  As I mentioned, this takes patience.  We'll continue to do this every afternoon for weeks.  When I untie her and try to walk her to the barn where she is separated in her stall, I hold her with about 12-18 slack and walk her.  At first she walks pretty good, knowing she can't out-pull me, and I reward her with kind words of encouragement.  Then her stubbornness kicks in and she pulls against me.  She gets real dramatic and falls over on the ground in desperation.  I laugh and nudge her to get up and she complies and we eventually make it to her stall. 


For getting to the stall, she gets a good neck massage.  I've read that you can also reward them by feeding them a range cube, but I've not tried that.  

Clarabelle's stall in the barn
We will continue working with her.  As with anything difficult, it is important to be consistent, persistent, and patient.  Perfect practice makes perfect and good habits instilled at an early age will continue throughout her life and like I mentioned, it is much easier to break a 130 pound calf than a 300 pound calf.  The Jefferson Davis Parish Fair will be coming up October 6 - 10th and maybe we'll bring Clarabelle for Benjamin to show if she's walking with a lead rope by that point.

Sunday, August 23, 2015

The Broody Hen

In one of the nesting boxes in the barn, there is a Black Star hen that is broody.  A hen that is broody simply means that she wants to be a momma.  Most hens will lay their eggs, sing a little song, and then it's up and off the nest and out to the pasture to do normal chicken things like scratching in the dirt, chasing frogs and bugs, and taking dust baths.  Not a broody hen.  A broody hen wants to sit on her eggs and hatch them.  She fluffs her feathers up and makes mean noises when you come around. If you try to lift her up to remove the eggs underneath her, she'll peck you with her beak.

Benjamin's job is to gather the eggs each day.  He was tired of getting pecked and asked if we could let the broody hen sit on and hopefully hatch her eggs.  I said sure.  She has four eggs underneath her and I had Benjamin mark the four eggs with a pencil.  He removes any new eggs that may be laid in her nesting box while she's off her nest each day and leaves the existing four eggs for the broody hen to incubate.

The broody hen is very dedicated to the task at hand.  She only gets up off her nest for very brief periods each day to get food and water.  Then she quickly returns, re-positions her eggs and sits back down on them.  Here is a photo of her all fluffed up and giving me the evil eye!:

The Broody Hen
A chicken egg takes exactly 21 days to incubate.  That means that on approximately September 8th we may have some baby chicks hatching and then maybe not. When it is really warm (which it is) sometimes the chicks develop a little faster and may hatch in 19 days.  There's always the possibility that the eggs aren't fertilized. The proper ratio is 1 rooster for every 10 hens in the flock.  We have enough roosters, but you just never know.  We'll keep our eyes open and ears listening for the first signs of little chicks in the barn.

Friday, August 21, 2015

Higher Ground

There is an old hymn that you can listen to by clicking here, that we sing at our church, and the chorus goes like this:

Lord, lift me up, and let me stand
By faith on Canaan’s tableland;
A higher plane than I have found,
Lord, plant my feet on higher ground.

It is a hymn, really a prayer, in which the songwriter aspires to grow closer to his Savior and by doing so becoming more Christ-like each day.  Rather than low living, the author of the hymn (and the singer of it) chooses to live on higher ground, walking with Jesus.  It's an inspiring song.  It should be our aim to have our feet planted on higher ground.

Our very wet first four months of the year reinforced the fact that our feet need to be planted on higher ground and our garden needs to be planted on higher ground as well!  Over the years I've amended our garden soil with tons of compost and garden soil, but it still needs to be higher to avoid sickly, yellow-leaved, scalded vegetable plants.  In order to combat this, I ordered a load of topsoil and had it delivered near our garden.  It would have been easier to dump it directly in the garden, but I don't have a wide gate leading into the garden area.  Therefore that caused me and my boys to work considerably in this effort.  We got it done, though, and hard work is good for the body and soul, I think!
A load of topsoil
Each day we loaded up bucketfuls of topsoil by shovel, put it onto a wagon and dumped it over the existing rows in the garden. This raises the level of the ground in the garden, but also will still allow the roots of our plants to reach the good, rich, worm-filled, microbe-laden soil that we have worked so hard to build over the years.

You can see the results of our work on about a third of the garden below.  A one inch rain packed it in after we dumped the dirt and smoothed it over the garden rows.  It looks like we tilled it, but we didn't.  It completely covered the existing ground, and the only thing you can see growing is a few stalks of sorghum that came up volunteer.  I'm allowing that to mature and I'll save the grain for seed.


I would assume that our work lifted the ground level in the garden by about three inches and once I pull up rows, the new level should be about 4 and 1/2 or 5 inches higher than it was last year.  I'm thinking that will really help out during future 'monsoon seasons.'  This year I actually had potatoes and beets that rotted in the ground.

In some areas of the garden, especially on the lower side, I had really high rows pulled up in which the ground level was high enough.  In those areas, I simply filled in the furrows between the rows with the topsoil.  
Filled in furrows between the rows
We've almost moved the entire load of topsoil into the garden.  I won't have enough topsoil to build up the entire garden area, and I estimate that I'll have about 1/4 of the garden area remaining, but that's okay.  I'll put that on the to do list for next year as I will be pulling up rows and planting the fall/winter garden over the next couple of weeks and I'm running out of time.  No worries, I'll pull up high rows and fill the furrows with chopped leaves and compost and the rainfall will flow around the garden in the pasture.

Project for next year!
Jennings, Louisiana sits at an elevation of 26 feet, 3 inches above sea level.  Higher ground.  That's what we're looking for - in our garden and in our spiritual lives, too:

I want to scale the utmost height

And catch a gleam of glory bright;
But still I’ll pray till rest I’ve found,
“Lord, lead me on to higher ground.”


Thursday, August 20, 2015

The Woodpile

It may seem a little odd to be talking about firewood when temperatures still hover in the mid - 90's and sweat quickly moistens your shirt by merely walking outside. Preparing for the future must be done, regardless of the season.  Goofy television shows have been produced that show 'preppers' in a kooky and unfavorable light, but truthfully, being prepared is just old fashioned wisdom.  That wood isn't going to split itself!

Be Prepared has been the Boy Scout Motto since 1907, but the idea of preparing is one that began many, many years before.  People had to prepare in order to survive. Survival is a great motivator. Despite relatively mild winters in south Louisiana, we still put up firewood to get us through the winters.  Putting up firewood is not a fun task, but one that must be done.  If one works in the summer, he can enjoy the warmth in the winter.

Our Woodpile (and a fat hen and rooster)
Speaking of warmth, Henry David Thoreau is credited as saying:

"Wood warms you twice, once when you cut it and again when you burn it!"

Last summer we had some water oak trees that were attacked by beetles and consequently died.  A friend of mine offered use of his chain saw and we carefully felled the oak trees, cut them up and stacked the logs in a nice stack.  There they sat for months, mocking me - "Stop procrastinating," they said.  "Come split us," they remarked.  Finally a month ago, I got out my ax, splitting wedge and sledge hammer and split all the oak logs up.  Mr. Thoreau was right - I was "warmed" splitting the firewood in July!

If you'll notice in the photo above, the wood is a grey color.  This color suggests that the wood has weathered or seasoned over the past year.  This wood will burn nicely. I tried to split the logs when the trees were initially cut, and the ax head bounced off of the green, uncured wood like a kid on a trampoline.  Once the wood dried it was much easier to split it up - except around the knots in the wood.  I kept my eyes on the prize as I worked, thinking about how nice it would be when the temperatures are 65 degrees colder and this wood would keep us warm and entertained while sitting in front of a roaring fireplace.

As I was splitting the logs, the chickens surrounded me, getting in my way and causing me to continuously shoo them away.  You see, a woodpile becomes a habitat for all sorts of insects, worms, and critters.  As soon as I would move a log, the ground was teeming with delicious morsels for the happy hens to devour.  I stacked the split firewood atop pipes to keep them from contacting the ground to avoid rotting.  The pipes that the wood is stacked on are re-purposed support poles from the kids' childhood swing set that I dismantled this summer, evidencing the fact that there's no such thing as retirement - even for a swing set!

Finally, I topped the wood pile with a blue tarpaulin to protect the wood (somewhat) from the rains that will come between now and when we finally light up the fireplace around Thanksgiving.  We'll likely go through this stack of wood this winter and then next summer, we'll start all over again.


Wednesday, August 19, 2015

Yellow Fat from Grass Fed Beef

We have been enjoying the beef from the steer we butchered back in April.  There really is a difference in the taste of grass fed versus store-bought meat.  We should have done this a long time ago.  The only thing about having a freezer full of beef that gives me pause is the fact that we don't have a generator to back up our deep freeze and with Tropical Storm Danny brewing way out in the Eastern Atlantic, it makes me a little nervous, but we'll cross that bridge when we come to it.

We really like the beef short ribs.  Tricia will bring them to room temperature and add some kosher salt and pepper to them.  


She puts them in a cast iron dutch oven and sears them.


The picture below highlights the topic of this post.  Notice that the fat is yellow.


Why is fat from Grass Fed Beef yellow and why is the fat from store-bought (feed lot) beef a pearly-white color?  Good Question.

I learned the answer from reading THIS ARTICLE and it was what I suspected, but before we get to what causes the coloration, the article said this:
Fat can be a wonderful thing.
Fats can be the most nutrient rich part of your diet, or they can cause numerous diseases – depending on which fat we’re talking about.  What an animal eats will change the kind of fat in its tissues.  If an animal eats a suboptimal diet including grains and legumes, its fat loses much of its nutrient quality in surprisingly little time.  
That sounds like crazy talk, doesn't it?  We've been accustomed to hearing that fat is bad for you.  To avoid fat.  Fat is unhealthy.  But the above study runs counter to that.  Hmmm...  Also, verses in the Bible seem to confirm that fat is a good thing. Take this one, for example:

Then Pharaoh said to Joseph, “Say to your brothers, ‘Do this: load your beasts and go to the land of Canaan, and take your father and your households and come to me, and I will give you the best of the land of Egypt and you will eat the fat of the land.’ - Genesis 45: 17-18

The Pharaoh liked Joseph.  He wasn't telling him that his family was going to get the scraps.  The fat of the land is a Good Thing.  Fat, if the animal ate a good, grass-fed diet, is a good, healthy, nutritious part of your diet.  I can remember being a young boy and we'd slice all the fat off of the meat.  My great-grandmother would sit at the end of the table and say, "You're not going to eat that? Pass that down here."

My great-grandmother was onto something!  The article mentioned above states that their study showed that grass-fed beef contains more Omega-3s and Conjugated Linoleic Acid (CLA) than grain fed meat.  There is also Omega-6, Cholesterol, and Transvaccenic Acid (TVA) as types of fat. Interestingly:
Trans-vaccenic acid is metabolized into conjugated linoleic acid, and performs similar functions.  It can speed fat loss, fight cancer, and improve brain function. It is technically a naturally occurring “trans-fat” but it does not cause the same the negative health problems that margarine or hydrogenated fats do.
Wow!  Fat from grass fed beef is good for you.  So finally, the answer to my question: Why is the fat from Grass Fed Beef Yellow?:

The grass-fed meat had higher levels of carotenoids, making the fat appear yellow.  Generally, the more carotenoids in a substance, the more nutrients it contains.  Yellow fat (like grass-fed butter) is a sign of high nutrient density.  One of the things you’ll notice when cooking grass-fed meat is the yellowish color of the fat.
More carotenoids = more antioxidants+nutrients (and more flavor too).
Generally, colors in food mean that it is healthier for you.  Speaking of colors, I liked the colors (and flavor) of the beef short ribs.  Here's a picture taken before Tricia stirred it all up:

Healthy AND Colorful!
To sum up the article (read it if you get a chance), their study said: 
When it comes to meat, grass-fed and grain-fed don’t even compare. Go grass-fed, every time.
We're sold on it.  Grass-fed Beef.  It's whats for supper.

Tuesday, August 18, 2015

Cicada (Locust) Killers!

I ordered a load of topsoil to be delivered to our house last week so that I could raise the level of the garden. As odd as it seems after posting about the drought just yesterday, sometimes the weather can be feast or famine - either too much rain or not enough.  The water-saturated soil from extensive rainfall amounts this spring really negatively affected the yield of our potato and tomato crops.  By carting this soil to the garden and putting a 3 or four inch layer of topsoil over existing rows raises the level of the soil but also will still allow the plants' roots to reach into the rich soil that has been improved by composting and adding organic matter.

The Dirt Pile
After the dirt pile had been sitting for a day, we noticed some strange things going on.  First there were many holes or burrows in the pile, being dug by some mystery creature.  The holes were about the diameter of a dime and fresh dirt from within the tunnels was being dropped right outside the entrance.
Tunnel with fresh dirt being dropped out
As we got closer to inspect the digging and try to determine what was doing it, we were immediately met with something swiftly buzzing around our heads.  At first I thought it was hummingbirds, but quickly saw that it was some huge hornet-looking creatures.  When I tell you they were two inches long, I'm not exaggerating a bit!  The would fly into the tunnel and disappear for a while and then emerge and fly off again.

Heading to the tunnel
I looked them up on the Internet HERE and found that they are not hornets, but a very large wasp called a Cicada Killer or Cicada Hawk.  Interestingly, the ferocious looking wasps drink nectar from flowers for their sustenance and will only sting people if threatened or handled roughly.  Once their burrow is dug to a depth of 10 to 20 inches deep, the female will go out in search of cicadas.  They will sting the cicada, paralyzing it and carry it back to their burrow.  This is no easy task since the cicada can weigh twice the amount of the wasp.

As I watched, a cicada killer flew with a cicada in her grip and clumsily flew into the side of the dirt pile, struggling mightily with her prey.  After much work, she lifted the cicada into the burrow and disappeared into the tunnel with the paralyzed/dead cicada.

Carrying her prey into the burrow
Once they get it into the burrow, you would think that they would eat it, but they don't.  They lay their eggs on it and then closes off the nest cell with dirt.  A single burrow has many nest cells.  The egg will hatch in a couple of days and the larvae feasts on the bodies of the cicada.  Thanks Mom! The larvae mature in about two weeks and then they will overwinter in the burrow and pupate in the spring, continuing the cycle.

That's a mean looking creature!
There is plenty of activity around the dirt pile with the cicada killers digging their tunnels.  I almost felt sorry for them that all the work they were doing was for naught.  The dirt pile was going to be completely gone within a week, weather permitting.


Russ, Benjamin and I went to work moving the dirt, dodging the flying wasps as they flew in and out of their tunnels.  We shoveled dirt off of the pile, moving it to tubs and carting it off to the garden.  After a few loads, the whole side of the pile collapsed, like a giant avalanche, collapsing the cicada killers' burrows.  It did unearth the contents of one of their burrows, though.  There were three dead cicadas in one of the burrows, put there by the cicada killer and undoubtedly has eggs laid on it somewhere.

Victims of the Cicada Killer
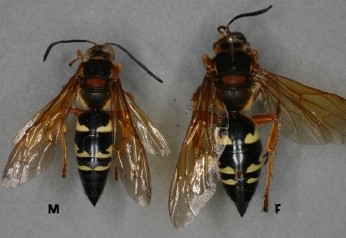
The image below was not captured by me, but you can see the differences in sizes between the male on the left and the female on the right.  Keep in mind these things are two inches long!  The females sting with their stinger.  Although the males don't have a stinger, they can jab with the spine.

Image Credit
They help keep the cicada population in check and I guess that is a good thing. Sometimes the cicadas incessant buzzing in the trees can get pretty noisy.  Without the dirt pile, the cicada killers will have to resort to Plan B, digging their burrows in the hard ground.  It won't be as easy as digging in a loose dirt pile, but they'll get the job done, I'm sure.  Cicada Killers - an interesting predator for sure.
Related Posts Plugin for WordPress, Blogger...