Saturday, May 31, 2014

Making Dewberry Jelly - May 2014

As I checked the inventory of Dewberry jelly in the pantry, I noticed that we have one half pint and one pint left.  It's time to stop fooling around and make some more jelly. It would be tragic to have homemade biscuits with no jelly in the house.  In previous posts, we showed you the really nice dewberries that we picked right in front of the house.  They were plump and juicy and should make some nice jelly.

Delicious Dewberries
We also showed you in earlier posts how we individually freeze the berries to allow for easy pouring or measuring out just what you need.  The recipe calls for 12 cups (or 6 pints) of berries, so I filled up measuring cup full, ensuring that I had enough.  The photo below is a little misleading.  It only held 4 pints, so I measured out 2 pints in another measuring cup and poured them on top.

6 pints of frozen dewberries
Now while I'm doing everything else, I'll put all of the rings, lids, and gaskets in a pot of water on the stove top and sterilize them.  I'm using the Tattler Brand lids  that you can use over and over again.  They were a little tricky at first, but now I like using them.

Sterilizing the lids, rings, and gaskets
We pour the 12 cups of berries into a large saucepan on the stove and add 1 cup of water.  Turn up the heat and bring them to a boil.  Now here's where the fun part comes in.  Get a potato masher and vigorously crush all the berries.  Just keep mashing and crushing until you have a pretty purple concoction.  It smells real fruity and nice.  Keep stirring.  Once it has come to a boil, turn the heat down to medium, put the cover on and simmer for 5 minutes.
Purple Passion
Now personally I don't like all the little seeds in my jelly.  I'll drink them in my morning kefir smoothies for breakfast, but I like my jelly to be seedless, so we'll pour the concoction through a sieve and capture just the juice.  Use the potato masher to work the mush back and forth so that the dewberry juice drains through the sieve into a measuring cup.  What we're looking for is EXACTLY 4 1/2 cups of prepared juice.

Straining out the Seeds
While the juice continues to drain, I clean up my saucepan and add 3 cups of sugar and a box of Sure Jell Premium Fruit Pectin.

Sugar and Sure Jell
I have exactly 4 1/2 cups of dewberry juice.  12 cups of dewberries yielded exactly 4 1/2 cups of juice.

4 1/2 cups of Dewberry Juice
I add 1 cup of water to the sugar/Sure Jell mixture and bring it to a boil that can't be stirred down.

Double, Double, Toil and Trouble, Fire Burn and Cauldron Bubble
Then I pour my dewberry juice into this boiling mixture and keep 'a stirrin'...

Stirring the Pot
Bring the juice and syrup to a boil while stirring constantly.  Boil for exactly 1 minute.

Now we're ready!
Remove from the heat and using a canning funnel, ladle the hot liquid into your sterilized jars, leaving a little head space at the top of the jars for expansion.

Filling the Jars
12 cups of berries make 4 1/2 cups of juice.  That juice when added to the sugar and Sure Jell will yield exactly 8 half pints of jelly.

Ready to put the lids on and process
Okay, so now I carefully use a rag to wipe off the rims of the jars.  I say carefully because the jars are doggone hot!  Then I put the rubber gaskets on the Tattler lids and put them on jars followed by the bands. This is the tricky part with Tattler lids. You are supposed to tighten the rings down snug and then back off slightly on the bands.

Affixing the lids/gaskets
Put all the jars into the the canner with a wire rack at the bottom so that the glass doesn't touch the bottom of the pot.  Make sure that your jars are covered with 1 to 2 inches of water.  Cover and bring the water to a gentle boil and once the water is boiling, allow them to process for 5 minutes.

Into the water bath canner
Now it is time to remove your jars after they've been in boiling water for 5 minutes. Use your canning tongs.

Out of hot water
Place them on a rack to cool.  Remember to get a couple of hot pads or dish rags and tighten the bands down really tight.  Don't disturb the jars of jelly for 24 hours.  Just let them cool and rest.

Letting the jelly cool
Once 24 hours has passed you can test.  The lids should be sucked down and sealed. If sealed properly, you can use your fingers to lift each jar just by the lid and they should hold.  If not, put the ones that didn't seal in the fridge.  Fortunately, all 8 half pints sealed. and I labeled them.

Signed, Sealed, Delivered!
I'll make one more batch to stock up the pantry.  It is hard to beat homemade seedless Dewberry Jelly!

Friday, May 30, 2014

Making Gumbo File

A little over a month ago, I posted This Post about Making Sassafras Tea in which I detailed how we identified the sassafras tree, got the roots cleaned up and boiled, and made some sassafras tea.  While doing that I asked Benjamin to take his machete and chop a few branches from the top of the tree we felled.  For the past month we've been drying the leaves.

To be honest, I had forgotten about them.  Somehow the sassafras branches with the leaves had made their way into the umbrella stand.  A couple days ago we had a 5 inch rain and when I removed the umbrella on my way out the door, I saw the leaves in the bottom of the stand and it reminded me of the unfinished project.  The leaves were dry and 'crinkly' and ready.

Dried Sassafras leaves
If you remember from the April blog post, sassafras trees have single-lobed, bi-lobed and tri-lobed leaves. Here is a dried tri-lobed leaf from the sassafras tree.  I always think it looks like a ghost.


Our project today involves making gumbo file (pronounced FEE-lay) with the dried sassafras leaves. Gumbo file is an herb that is used to thicken gumbo.  The native Indians in Louisiana taught the Acadian settlers about how to make it and use it to thicken gumbo.  Along with thickening, it provides a nice, earthy flavor. Normally, okra is used to thicken gumbo, but we sometimes use file along with okra for seasoning/thickening.

I carefully removed the dried leaves from the branches, trying my best to remove the stem of the leaf.  Then I put them in the food processor with the chopping blade on.

Spin Cycle
After putting the top on, I pulsed it around for a while.  The aroma coming out of the processor was nice and can only be described as 'woodsy,' 'earthy,' and fragrant.  I made the mistake of removing the top before the 'dust' had settled and inhaled a big nose of it and started sneezing.

Finely Chopped
I learned a couple of things from this experiment:

#1 The next time I do this (and I will do this again!), I'm going to dry a whole lot more leaves to make file, as the amount I made will be consumed after we make the first one or two gumbos.
#2 While the food processor certainly makes things easier, it doesn't pulverize it to the fine, powdery consistency that I'm looking for.  I'm going to use a mortar and pestle (or molcajete) to further grind the dried leaves after I get them to this point.

It didn't make much!
I poured the ground up leaves into a sieve with a small screen as I want to only allow the chopped leaf portion to get through to the bowl.  I don't want any of the little sticks from the veins in the leaf in my file.

Filtering the file
I use a spoon to run back and forth against the sieve to force the finest portion of the ground leaves into the bowl.  You can see the finer particles sifting through the wire mesh.

Partly cloudy with a chance of File Showers
And here is our file.  Again, I'd like it to be processed to a little finer consistency, but we can work to improve that portion of the process.  The main ingredient is there and if the fragrance is any indication, it is a better product that one you purchase at the store.

All we need is a gumbo now!
I save little spice containers and re-use them to repackage homemade ground criolla sella pepper that we make, to store seeds that I save, and now to store homemade gumbo file.

Packaged in a spice container
After thinking about it, I dumped the file into the molcajete (mortar & pestle) and ground it up real fine - into a nice powder.  It pulverized it a lot finer than the food processor could get it.

Pulverizing the file in the molcajete
For comparative purposes I scooped some store bought gumbo file out of a jar in the spice cabinet.  That's it on the left.  Then I scooped out a spoon of the file that we just made.  Ours is in the spoon on the right.  Just look at the difference!  They both smell great and I'm sure they'll both do the job in a gumbo, but I like ours and give it two thumbs up in the 'eyeball test.'

Store bought on the left.  Homemade on the right
Now all we need is a nice Chicken & Sausage Gumbo to put it to the taste test!

Thursday, May 29, 2014

Boogerin' up the Threads

A while back I added wheels to two sagging gates in order to keep them from dragging as I open or shut them.  Gates that have any length to them are notorious for dragging.  The process has worked out quite well until this past week when I discovered that the plastic inner portion of one of the wheels had broken, leaving the gate dragging on the ground again, darn it.  I was able to find another wheel in the feed room and quickly repaired it.

The fix involved items that I had on-hand.  I didn't want to have to drive 5 miles to the hardware store.  You can see in the photo below that the bolt I'm using is about 5 inches too long, but that's okay.  It still works to make the gate easier to close.  You might say that our animals live in a "gated community."  Corny?  Yep.

Gate wheel repair
I didn't have a deep socket deep enought to tighten the nut on the bolt, so it was a slow process tightening the nut with a crescent wrench while I had the gate propped up on a brick to give me enough clearance to work on it.  The key here is that I want to tighten up the nut tight enough to hold the wheel, but loose enough so that the wheel would still roll freely.  For some reason, while doing mindless things, my mind tends to drift and I began to think about something that I learned years ago on the farm from my Dad.

It is a process called, "boogerin' up the threads."  I'm sure there is a more sophistocated name for it, but that's what we called the process.  Let me explain a little bit.  When you are tightening up a nut on a bolt, especially when there might be vibration, you want to make sure that your nut doesn't back off.  If the nut in the photo below loosened up, the wheel would wobble, making it difficult to push open and potentially wallowing out the hole drilled in the gate frame.
We don't want the nut to back off...
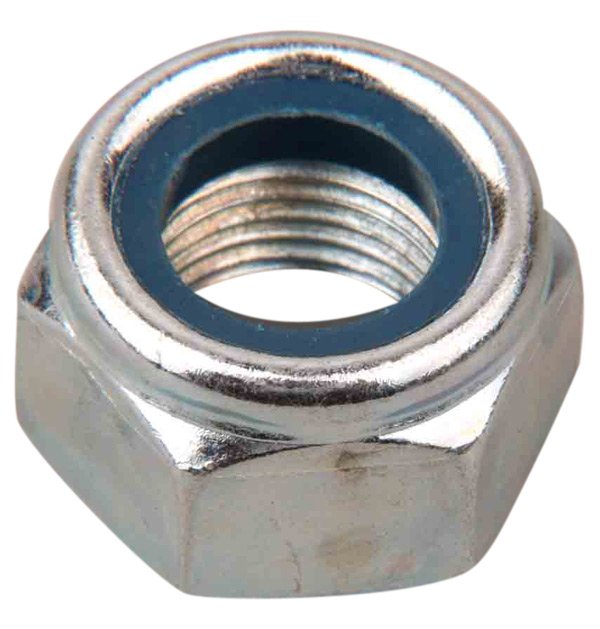
Now honestly, there are several efficient ways to secure the nut to the bolt so that it doesn't back off. First, there is a product called Loctite.  It is an adhesive that you put on the threads to secure the nut on the bolt and prevent loosening.  I had no loctite on hand.  Then there is something called a lock nut (shown below). A locknut has a nylon insert that is marred when it is screwed onto the bolt, creating friction against the threads of the bolt and making the nut resistant to backing off.  And nope, I didn't have a locknut in my containers of assorted nuts and bolts on my work bench.
Image credit
There is a third, and much less technical option to prevent the nut from backing off. You might call it redneck ingenuity, because it creates the same sort of friction that the locknut does.  My Dad taught me this process whose technical name is 'boogerin' up the threads."  What you do is simple.  You take a hammer and a chisel or punch and after tightening up the nut to the right torque, you simply bang the chisel or punch against the threads right past the nut with your hammer.  This damages the threads somewhat so that the nut won't back off.  Ingenious!

Boogerin' up the threads
I think the process of boogerin' up the threads has great potential for use in other areas besides repair and maintenance.  Being stubborn or hard-headed is often NOT considered a virtue.  Sometimes people are very close-minded and won't listen to anything that goes against their current mindset or frame of reference.  They are tightly fastened to the status quo.  On the other hand people frequently give up and quit on things, when they should instead dig their heels in and fight.  They too easily loosen themselves when the slightest friction arises.

Blessed is a man who perseveres under trial; for once he has been approved, he will receive the crown of life which the Lord has promised to those who love Him.  James 1:12

Many times I've been tempted to 'throw in the towel' and sometimes I have quit, to my shame.  But I don't want to be a quitter.  I want to finish the job - as a Christian, as a husband, as a father, and as a farmer.  I think the key is to assess these situations through prayer and careful study and determine which battles are important to us and worthy of our efforts.  Once we've determined those issues deserving of our efforts, we should roll up our sleeves and 'booger up our threads' so that when the vibrations come and the things start wobbling, we won't back off and we'll continue hanging on securely until the job or our life is complete.

I have fought the good fight, I have finished the course, I have kept the faith.  2 Timothy 4:7

Wednesday, May 28, 2014

Another Family Favorite Zucchini Recipe

Yesterday we were talking about the blooms of the squash plants and today we'll continue with the squash theme and I'll show you a portion of the squash patch.  We have several rows of yellow crookneck squash, straight neck squash, grey zucchini and black beauty zucchini.  We picked some of the first squash a couple of days ago and grilled them with some butter and minced garlic that we brushed on.  They were very nice.

Here is the squash patch.  I've mulched pretty thick with hay to keep the squash off the ground as sometimes I experience rot from the fruit touching the moist dirt.

The squash patch
Today we'll harvest a couple of the grey zucchini.  I like to pick them before they get too big.  If you leave them on the plant, they'll grow to be monsters, but the younger ones are tender, have smaller seeds and are just better for eating.

Perfect eating size
While I was searching through the patch for others, I set two of them down in the hay walkway against the fence and it attracted a crowd of on-lookers.  If they could've gotten their heads through the fence, you would have seen a number of holes in the zucchini!

What do we have here?
"And lead us not into temptation, but deliver us from evil." - Matthew 6:13  I really shouldn't have done that to those poor birds!

Supper for us - NOT the chickens!
Back in July of 2013 in THIS BLOG POST we showed you a recipe we like using zucchini.  Today we'll show you yet another one.  Today, we decided to make up some zucchini fritters.  They are really nice, easy to make and can be made with things you'll commonly have in your kitchen.  First we grated up the two zucchini in the food processor and the two yielded about 6 cups.  We put the grated zucchini in a colander and sprinkled with kosher salt and tossed.  This will make the zucchini drain off a lot of the liquid.

Draining off the liquid
After about 15 minutes of draining, we dump into a mixing bowl and add 2 cups of bread crumbs, two eggs, 1/2 cup of Parmesan cheese, and chopped up onions and peppers.  Feel free to ad lib here.  We added some sugar snap peas and chopped green onions along with a couple teaspoons yogurt.  We also added some dried Criolla Sella pepper to give it some spice.

Mixing up all the ingredients
Then, using your hands, make some patties similar to the way you would make a hamburger patty.  Squish them on paper towels to remove as much liquid as possible from the patties.  Add some butter to a cast iron skillet and get it heated up.  Drop the fritters into the buttered skillet and allow to cook, flipping when they firm up. When golden brown on both sides, it's time to ring the dinner bell and round up the troops.

Deliciousness!
You can dip them in soy sauce or make a remoulade, if you wish, but I wanted the flavor of the freshly picked vegetables to come through so I ate them plain.  They are best while still warm.  They are sort of like a crab cake, minus the crab.

Come and Get It!
I'd advise on doubling or tripling the recipe as they go quickly.  Bon appetit!

Tuesday, May 27, 2014

The Squash Blooms

In 1977 I was eleven years old and there was a very popular song that played on the radio by the Commodores, called "Easy Like Sunday Morning."  It's such a smooth song and seems far too happy to be a song about breaking up!  Sunday mornings are easy - and happy.  I think I've explained that on weekends, we sleep a little later and normally go out and milk the cows and goat at around 7:30 prior to washing up and going to church.

On workdays, we're going out in the dark and you really miss a lot of the sights and sounds of the new day. On Sunday mornings I get a chance to see the sun as it is filtering through the trees from the eastern horizon. The breeze is cool and the lighting is perfect.  I'll normally carry my camera to capture anything that might jump out at me.  This Sunday, the blooms on all of the squash were opening up wide, as if to call me to stop what I'm doing and observe the splendor that I miss on other mornings.  The blooms open up wide in the morning and close at night.  You can see that the ants have made their way to the inside of this squash flower.  There must be something sweet in the flower that is attracting the ants.

Ants in the Flower
But ants aren't the only thing that these flowers attract.  Can you see what's in the middle of this one?  A little blurry, I know.


Let me see if I can zoom in a little bit.  Aha!  A honeybee.  If you look closely he's got sticky pollen stuck all over his legs and under-carriage and tail.  He's liking this flower and he's probably one of the guys that live in the column by our side door.  I appreciate all of his hard work in pollinating the vegetables in the garden and he's precisely the reason I don't have someone come remove the colony of bees from our side door.  Maybe I should call them our "columny" of bees?  I stood out in the squash patch for a while watching the bees fly from flower to flower doin' work.

Pollinating Honeybees
There are male squash flowers and female squash flowers.  The way you tell them apart is the female flowers have a small, enlarged part at the base of the flower that will become the fruit of the squash plant.  Can you see it in the photo below?

Female Squash Flower
The male flower is a more showy flower that is on a longer, very straight stalk than the female flower.  It does not form fruit.  Can you see the difference in the male flower below from the female flower above?

Male Squash Flower
Although I've never tried them, I hear that you can pick the male flowers and stuff them with cheese and fry them.  I'm gonna try this.  Since they don't produce fruit, you're not losing anything by picking them.  Just make sure to leave enough male flowers for the honeybees to collect the pollen from the male flowers and go to the female flowers to fertilize them.  If you pick all the male blooms for frying, you won't have any squash.


From what I see in our garden, there are many more male flowers than female ones. These blooms are as pretty as anything you'll see in a fancy flower arrangement. One thing you want to be careful with when growing squash is harvesting.  Squash grow quickly and I find they are best when young - both for yellow squash and zucchini. Yellow squash should be picked when pale yellow.  Sometimes we don't harvest as often as we should and they get overripe and turn dark yellow and hard.  I hate when that happens.  Once they start flowering, it's best to stroll through the squash patch and harvest every day.

Bright Yellow Blooms
The brilliant yellow blooms are as bright as the sunshine and as long as the bees do their job, we'll have plenty of squash to saute in butter, grill with butter and garlic, and make cheesy, buttery casseroles with.  If you go back through the pictures, you can spot baby squash in most of them, including one at the seven o'clock position in the picture above.

Monday, May 26, 2014

Putting the finishing touches on the 2014 Potato Harvest

It took us three afternoons to dig up all of our potatoes.  It was hard, but rewarding work.  We learned a few years ago that potatoes will last for a long time if you DON'T wash them.  So we brought them inside and weighed them.  We were amazed to see that our total harvest on 4 1/2 rows  weighed in at a whopping 107 pounds!
2014 Potato Harvest
So the next thing that we did was put them into milk crate type storage containers so that there is plenty of air flow.  We'll put them into a dark pantry and pull them out as we need them.  To give a little perspective, Russ (who is 5' 9") laid down by the harvest baskets.


We went through all 107 pounds of potatoes, sorting them out by sizes.  I'm sure there is some tool that does this mechanically, but we just do it by hand.  In the first container we put all the really small potatoes, including those from the size of a marble to the size of a large olive.  We'll eat these first.

Extra small potatoes
The next size sort are those that I call "Crawfish Potatoes," since these are the size potatoes you often see used in crawfish boils.  These potatoes are about the size of a ping pong ball.  These are a nice size for cooking with fresh green beans.

"Crawfish Potatoes"
The next size that we sorted were the medium sized potatoes that ranged from the size of a golf ball to the size of a tennis ball.  We like to take these size potatoes and cut them in half.  We then toss them in butter and fresh rosemary and then roast them in the oven.

Medium Potatoes
Finally we have the large potatoes that included anything larger than a tennis ball. These we'll shred up for making hash browns or use to make potato salad or other baking needs.

Large potatoes
And that closes out the 2014 Potato crop.  We generally try to plant them each year on February 14th. We'll make these last as long as we can.

SPUDS!
We'll also save some of them to use as seed potatoes for next year.  The half row of potatoes this year included seed potatoes that we saved from the previous year.  That was the first year that we've been successful in saving seed potatoes, so that was a positive.  SPUDS!  I was wondering how potatoes came to be known as spuds and in THIS LINK I learned that a spud was a sharp-bladed tool used to dig up potatoes and people nicknamed the potato after the implement used to dig it.  The nickname caught for some strange reason.  Regardless if you call them spuds or potatoes, they make a nice meal!